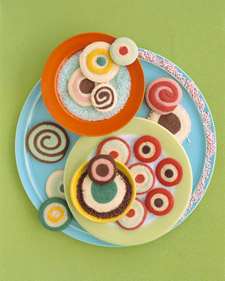
 Holiday Icebox Cookies
Icebox cookies are really just extra-pretty sugar cookies. Before baking, the dough is flattened, rolled into logs, chilled, and sliced-steps kids can have fun doing themselves with your supervision.
Ingredients
- 1 1/2 cups (3 sticks) butter
- 1 3/4 cups sugar
- 1 teaspoon salt
- 2 eggs, plus an extra egg white for "glue"
- 3 teaspoons pure vanilla extract
- 5 cups flour, plus more for work surface
- 2/3 cup milk
- 1/4 cup cocoa powder
- Food coloring, in various colors
Directions
- Using the electric mixer, mix the butter and the sugar until creamy. Add the eggs and the salt, and mix well. Beat in milk and vanilla. Add flour a little at a time, mixing it in until all of it has been incorporated.
- Divide the dough into balls, one for each color. For chocolate dough, add cocoa (1/4 cup is enough to flavor half a batch). Mix well with electric mixer. For colored dough, start with 1/4 teaspoon food coloring, and mix well. Add more in tiny amounts for darker colors. Gel-paste coloring can be intense, so add it gradually.
- Wrap each ball of dough in its own sheet of plastic wrap; pat flat into a rectangle. Refrigerate at least one hour or until ready to use.
- Parchment or waxed paper makes a good work surface. Sprinkle generously with flour, then roll out each piece of dough 1/4 to 1/2 inch thick to make the swirls; you can use thicker layers for the bull's-eyes.
- The bench scraper is a good tool for trimming dough's edges to make them even. The egg white, brushed on with a pastry brush, will act as a glue, making the layers stick together.
- For center, with your hands, roll chocolate dough into a 1/2- to 1 1/2- inch-thick rod; chill 20 minutes. Place rod on edge of rolled-out dough that's been brushed with egg white.
- Roll rod inside sheet of dough. Cut the dough where it meets up. Seal by pinching and pressing gently. Chill 20 minutes, then repeat to add other layers. To decorate, go to step 7, or jump to step 8 for plain.
- For spirals, measure and trim two or more colors of dough to same size. Brush on egg white, then stack layers. Brush top with egg white. Starting at one end, roll up the dough.
- Smooth and straighten the layers as you roll them so there are no gaps, then gently pinch and press the edge of the roll to seal it. Now the dough is ready to decorate. If you want plain cookies, skip to step 18.
- Add your favorite toppings (try coconut, colored sanding sugar, chopped nuts, or chocolate sprinkles): Spread topping in baking sheet, brush dough with egg white, and roll the log in topping.
- Roll each log in parchment or waxed paper; twist the ends of the paper closed. To help the logs keep their round shape, set each in a cardboard paper-towel roll that you have sliced open lengthwise.
- To remember what colors you have already used, with crayons, draw the designs onto key tags; tie the tags onto the paper covering the logs. Chill logs until they are solid, about 1 1/2 hours.
- Cut 15 inches of dental floss (or double thickness of thread). Let log soften for about 10 minutes. Remove parchment. Wrap floss around log and pull through. Make the slices thin: 1/4 inch or less.
- Preheat oven to 350 degrees. Place slices on an ungreased baking sheet (lined with parchment paper). A grown-up should bake the cookies 12 to 15 minutes, until firm but not browned. Let cool on baking sheet for several minutes, then transfer to a wire rack.

No comments:
Post a Comment